
In this section the guidebook will go page by page through the entire application dIn this section the guidebook will go page by page through the entire application document. Please note, DMR’s aquaculture staff are available to answer questions about the application and process. For questions about LPA license or application process, please contact: Flora Drury (DMR) by email: flora.drury@maine.gov.
First, on page i of the application form, there are a number of directions in terms of how to fill out the form. It is important to fill out the application form in black ink. There is a nonrefundable $100 fee for submitting the application.
There is also an application checklist on page ii, which should be used to make sure you have all of the application materials required. A copy of this is posted below.
For all LPA applications it is required that you have:
- A check for the application fee payable to “Treasurer, State of Maine”
- Vicinity Map with required items shown
- Overhead view gear map depicting the layout of the gear from overhead
- Cross-section view map depicting gear & moorings from the side
For all sites that are within 300’ from shorefront property (measured from mean low water), you also need to have:
- Tax map certified by the Town Clerk
- Riparian list certified by the Town Clerk
- Copies of receipts for sending certified mail to riparian landowners
Before continuing with the application, please carefully review the “REQUIREMENTS AND RESTRICTIONS FOR LPA LICENSES” and “IMPORTANT INFORMATION FOR LPA LICENSEHOLDERS” on pages iii and iv of the application document.
General Information
Starting on Page 1, under “GENERAL INFORMATION” you can start to list out various details about you. Under the current system, a municipal shellfish committee can list themselves as the applicant. Under assistants, you can list up to three individuals who can work on the LPA, this generally would be key team members. When writing into “Location of License Site” the body of water is more general, (ie: Casco Bay) and the additional description would be the closest shoreline, (ie: East of Hog Island).
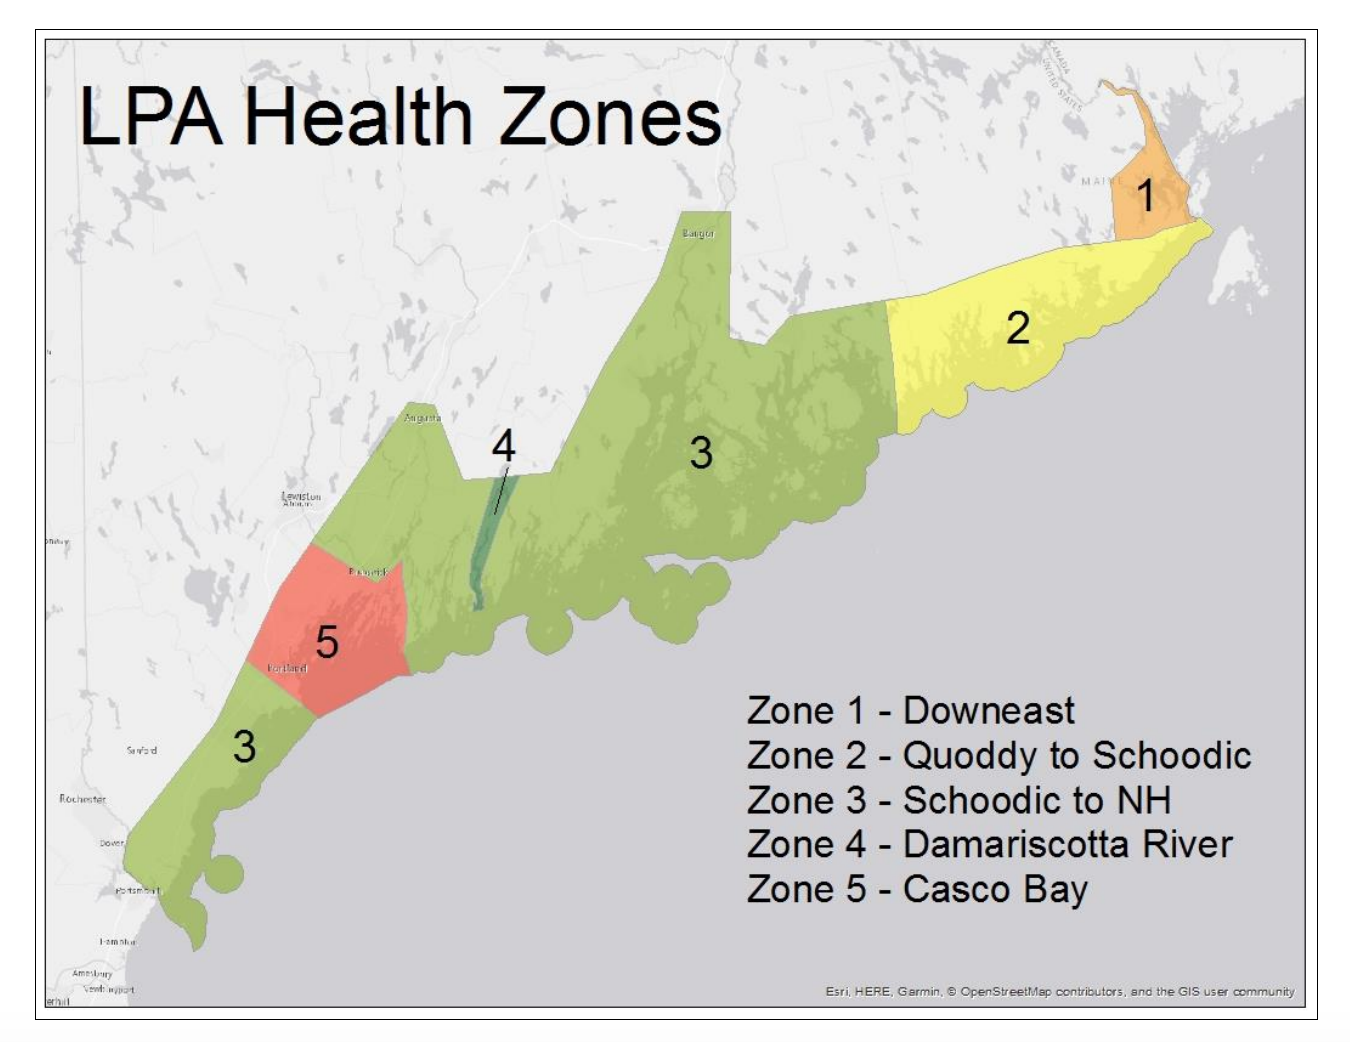
For LPA Health Zone, you can navigate to the website below.
DMR Aquaculture LPA Health Zone Website
You can also check the map below:
Species and Source of Stock
In the section titled Species and Source of Stock” on page 2, you should identify what species you will be working with on the LPA.
Starting from left to right in the table, in the first column you should check each species you will be growing. In the third column titled “Source of Stock” you need to copy the address of where you are getting seed if you are getting seed from a hatchery. If you are using either Muscongus Bay Aquaculture, the Downeast Institute, or Mook Sea Farms you can also check the box for approved hatchery in column 4. If you are moving seed from one growing area to another, you can check the “Wild” Same LPA Health Area box in column 5. However, if you are moving seed from an area in a different LPA Health Area (based on the map above) you can check the “Wild” Different LPA Health Area (Transfer license Required) box in column 6. Please note to move seed across zones you will need a transfer seed license.
To start the process for a transfer seed license, contact Marcy Nelson at DMR prior to placing anything on your LPA site at marcy.nelson@maine.gov or 207-633-9502
Water Quality Information
For Water Quality Information on page 3 of the application, please visit the website for DMR Shellfish Sanitation and Management by using the link address below.
https://www.maine.gov/dmr/shellfish-sanitation-management/closures/index.html
When you click the link above you will find a large list of growing area closure notices and maps. Locate your area, and click under the bacterial notice map column (the second from the left) to find the growing area code, and specific zone. The growing area code is at the top of the map, and the specific zone is above the area. Please note even if you are not applying for a LPA in a prohibited zone, you must check the box that you recognize only seed can be grown there.
Alternatively, you can also use the Aquaculture GIS Map which we describe in the next section. This would entail loading the Aquaculture GIS Map, navigating to layers, clicking the MaineDMR NSSP checkbox, and then selecting the closure area nearest to your proposed LPA.
Coordinates
Also on page 3, you need to fill out the “Coordinates” section. You can find your coordinates using google maps, and clicking the area in which you will be putting the LPA. Once you click in an area, a white box will appear with the coordinates in decimal degrees.
You can also find coordinates by using your smartphone GPS while standing in the proposed license using maps, compass, or a similar application.
Site Characteristics
On the top of page 4 of the application, there is a table labeled “Site Characteristics”.
Surrounding Uplands and Bottom Characteristics: Please visit your potential site and describe in a few words what the bottom and upland areas look like. This could include: forested, or populated for upland areas, or mud, rocky, or shellhash for bottom characteristics.
Depth, Essential Habitat, and Eelgrass: Use the Aquaculture online GIS map (link below) to find known essential habitat and eelgrass beds. The DMR also prefers you make physical observations for eelgrass as well.
https://maine.maps.arcgis.com/apps/webappviewer/index.html?id=b846cf37b1d64c988f89eafa085c8b7a
Please note, this map can take a few minutes to load completely. To navigate this page, you can review some instructions by clicking here. These instructions demonstrate how to use layers (which show where different datasets such as eelgrass beds or bird habitat), printing and measuring on the map, as well as how to draw the lease you hope to apply for. You can also use the National Oceanic and Atmospheric Association (NOAA) chart layer to designate the depth at mean low water and depth at mean high water. Using the layers in this map, you can answer the questions in the site characteristics table including water quality, essential habitat, eelgrass presence, and others. Note, that the dots designating pending leases are not accurate descriptions of the entire space that lease could take up.
Existing Uses
Also on page 4, there is a second table where you will list existing uses. To fill out each row, you need to provide a detailed description of different activities going on in and around the proposed LPA site, including commercial fishing, recreational fishing, boating activities, and any other activities such as kayaking or swimming. As it states on the form, try to include as much detail as possible, including frequency, season, and amount of any activity. This section will also need a signature from a local harbormaster to certify what you have listed is correct.
Vicinity Map
Starting on page 10, you are asked to develop a vicinity map. Each vicinity map must include the following: the location of the site, a 300 ft. radius circle around the site, a 1000 ft. radius circle around the site, a North Arrow, depth contours, mean low water, mean high water, ebb and flood directions, a scale, distance to any DMR water quality closure lines, and gear orientation.
Drawing the map: Using the Aquaculture Online GIS Map, as described above, you can use the measuring tool to check 1000 ft around your proposed site. You can also use Google Earth to create vicinity maps or you can print out NOAA charts and draw by hand using a compass and other drawing tools. NOAA charts have a majority of this information, so they are a good starting point for the vicinity maps. Below, the MSLN project coordinator, Gabby Hillyer, developed a 30 minute walkthrough video for drawing vicinity maps.
The video above describes how to draw vicinity maps in the Aquaculture Online GIS Map and Powerpoint, which is the more commonly used mapping software for this part of the application. The video runs at 30 minutes long. The entire drawing process using the technique presented should take about the same time. It goes through step by step how to add drawing components to the Aquaculture Online GIS Maps and transfer it to Powerpoint to add labels. The area chosen on the map should not be considered an endorsement for aquaculture in that area, but instead was chosen at random.
Label: You need to identify any of the items on page 10 that are within 1000ft of your proposed license area. To do this, you can load the Aquaculture Online GIS Map, add in the layers using the layer list button, and then use the measurement tool to check if they are within 1000 ft. of the site. If they are, you need to indicate how your LPA would impact each item. These items include moorings, state and federal beaches, navigational channels, beaches, and others. If none of the items are applicable, you can check “None of the above” at the bottom of the page.
Gear Description
The application lists a number of gear types on page 12. After determining what type of gear you will be using in the LPA, you need to check each gear category and list individual gear types. Try to be as specific as possible for the table, as the more detail added here, the less likely follow up clarifying (and time consuming) conversations will be. This is also the most important section for the Army Corp license approval process. Some examples are provided on page 12. After determining which gear you will be using, you also need to check the applicable boxes at the bottom of page 12.
Individual Gear Type: On page 13 of the application, fill out tables describing the gear type and number used for each type of gear checked on page 12. In the first column of the first table highlight gear type and number used, in the second column add dimensions for each individual gear type, and then provide dates the gear will be in the water.
Bottom Table: In the second table on page 13, provide a maximum dimension for your gear layout, what types of mooring/tackle you will be using for your gear, and if there are seasonal changes to your gear deployment. Please note the outer dimensions of your gear layout cannot exceed 400 square feet.
Overhead View and Cross-sectional View of Gear Layout
In this section, illustrate what your equipment will look like both looking down onto the site, and from within the water column. Include, describe (providing dimensions) and label rope, buoys, anchors wherever they will be used and visible. Illustrate a different version for each showing any seasonal changes that will be made. You can draw these by hand as long as all information is legible.
Required Signatures
As described on page 16, there are multiple people who have to sign off on the application. This includes the harbor master (or a town official if there is no harbor master), a marina or lobster pound owner (if applicable) any riparian landowners of the intertidal zone (for sites above mean low water) and the shellfish committee chair (for sites above extreme low water).
Riparian Notification
On page 17, the application form statesthat for all sites within 300 ft of shorefront land you are required to notify riparian landowners. This notification includes sending a copy of your application to all riparian owners whose properties are within 300 ft. Most likely all intertidal LPA applications will require riparian notifications. However, you can check your vicinity map to be sure it falls within 300 ft.
Riparian Owners List: For the Riparian Owners list on page 19, include the current owner’s names, mailing address, and the map and lot number for each land parcel within 300 ft of your proposed LPA. Contact your town clerk or municipal tax collector for a parcel map. Using this parcel map, first, mark where your LPA boundaries are, and then identify all of the landowners within 300 ft of the proposed area. For each land parcel within 300 ft, you need to fill out an additional row in the column on page 19 or page 20. You can use as many copies of this sheet as necessary. Once that list is complete, you need to have it certified by the Town Clerk. Please make sure the Town Clerk certifies each page that is used.
Print out and mail a copy of the completed application, as well as page 16 to landowners using certified mail. Make sure you keep receipts of the certified mail. The receipts are a required attachment for the application. Please note, you can also include a letter from the municipal shellfish committee to riparian landowners, perhaps explaining more about the project.
Please Note: You do not need to limit what you send to riparian landowners to this application. You could, and are encouraged to add letters or other documents that can provide more context for the project, particularly the benefits of the project for the community and shellfish harvesting.
